
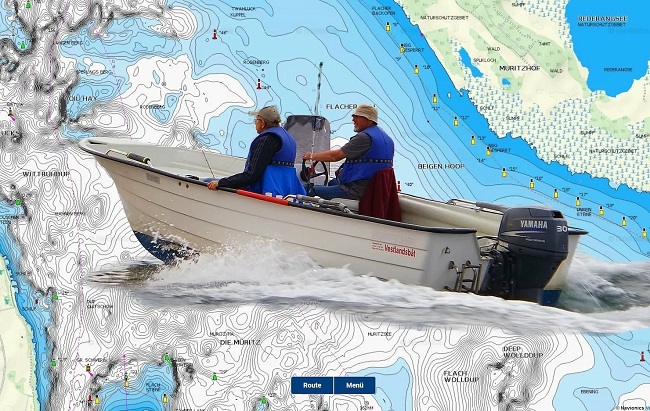
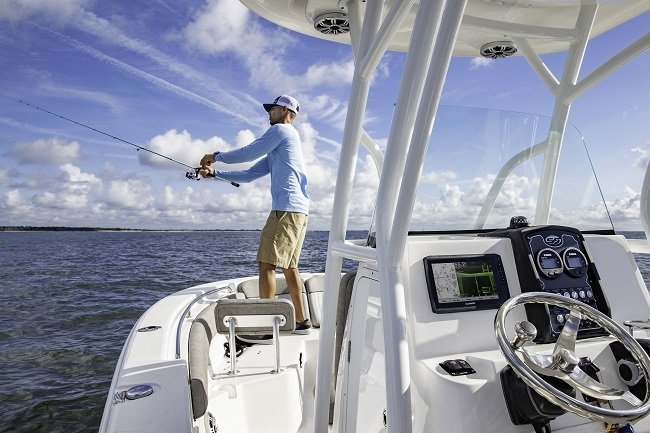
Go Fishing With German Efficiency!
In this article you get an introduction to fishing with a fish sonar. On one hand, the general basics of modern fish finding, and on the other, how to use a fish finder – technically. Such basic knowledge about fish sonars is the fundamental prerequisite for choosing a fish finder, which is well suited for your personal needs.
It is all too easy to take the wrong decision due to a lack of information and sink several hundred euros into the proverbial bottom of the sea. The first thing to consider when buying a fish finder is that it is designed for your preferred type of water.
Because it is unfavourable, if important functions are simply missing or other unnecessary ones have been expensively paid for. Once the device has been installed and used, it is usually impossible to return it.
-
The Ultimate Fish Finder Guide
Download 40 pages for free now
Reviews ( 17 )
The most important reason to familiarise oneself with the functioning of fish finders is to reduce the information gap between retailer and customer (you). Customers want to spend as little money as possible on the functions they need. The retailer, on the other hand, lives from sales.
That is why they often advertise fantastic new functions as virtually indispensable. However, only very few know, whether these are really necessary. So that you feel differently in the future, we have summarised (and explain) the most important functions of a fish finder in this article.
Table of Contents
How do fish finders work and how to use them?
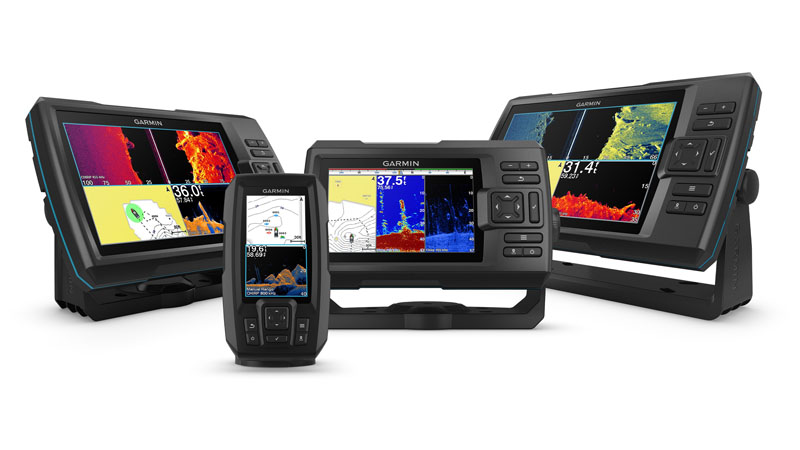
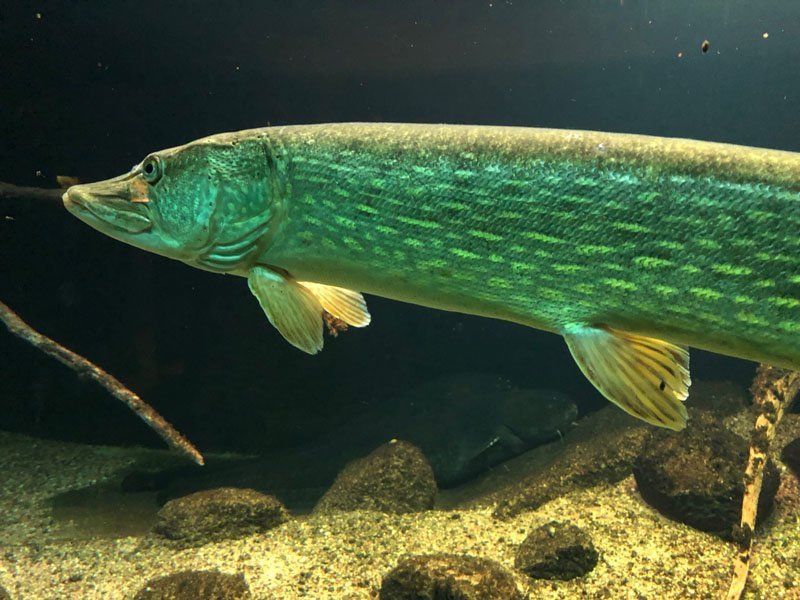
The transducer is placed in the water and emits downward high-voltage pulses in the ultrasonic range. On their way down, the sound waves encounter obstacles such as
- branches,
- objects floating in the water,
- rocks,
- the bottom
- or even fish – and entire schools of fish.
If a sound wave hits such a one – or at the latest the ground – then it is reflected to be received again by the transducer.
The sonar’s software then converts the received signals into an image and displays it on the screen. Based on the received signals, the software calculates whether it is a fish, branches or a hard or soft substrate.
How many watts should a fish finder have?
The more watts a sonar has, the higher is its transmitting power. Basically, more watts are always required in the USA than in Europe. The reason is quite simple. There are many and big competitions with prize money in the millions.
This means that the demands on the equipment are much higher, because every second in a three-hour competition counts. Here in Europe, competition fishing is banned in most states. And if not, then many competitions are more like a typical fishing club excursion with comfortable sitting on the edge of the water.
But now back to the wattage. The power of a fish finder is given in watts (RMS – Rout Mean Square), which describes the average value of the power of all frequencies. The wattage determines the strength of the signal that is sent to depth.
- Consequently, the deeper you fish, the higher the wattage should be.
- It also needs to be high if the frequency used is high.
You can compare this to calling a friend. The further away he is from you, the louder you have to scream. And, if you have a squeaky voice, you have to put more power into your voice to be heard (high frequency = Police Academy, Lawerne Hooks says hello).
-
The Ultimate Fish Finder Guide
Download 40 pages for free now
Reviews ( 17 )
- Rated 5 out of 5
Raphaël G
Very effective. - Rated 5 out of 5
Vladimir M
The book describes the fish finder physics and builds up your understanding of how it actually works. I have yet to apply this knowledge with my Humminbird, but having that much of theory is extremely helpful in understanding and processing the sonar output. - Rated 5 out of 5
NICHOLAS JOHN REECY
The Deeper Guide was just what I was looking for. YouTube is full of reviews of the sonar but little in the way of education. I highly recommend for those wanting to better understand their Deeper sonar. - Rated 5 out of 5
Henrik
I am a beginner when it comes to fishing with fish finders. For me, the book has been very informative to judge the displays on the fish finder “realistically” and to recognize what limits there are when searching for fish with the fish finder. Now I know when I have to use my regular sonar and when I have to use my ClearVü or which settings I should apply to the device at which spot. I was impressed by the many illustrations, especially for understanding the functions. - Rated 5 out of 5
Dr. Manfred Marx
Very well written, so that it is understandable even for amateurs and structured concisely. - Rated 5 out of 5
Andreas Witz
An excellent book for learning about fish finders. - Rated 5 out of 5
AK
The ultimate fish finder guide is a beneficial introduction. I am excited to put into practice what I have learned. - Rated 5 out of 5
Lübbe Wolfgang
A well-written problem solver. - Rated 5 out of 5
Kalksee
The book is unmatched for understanding how a sonar/fish finder works. I was a fish arch hunter, and I suspect my fishing tactics will change. The book has clear writing, and you understand you understand a lot the first time you read it. I can only recommend it to anyone interested in technology. Thank you for this fantastic book! Thoralf - Rated 5 out of 5
Enrico Indelicato
I had absolutely no idea about fish finders. Since I read the book, I had a real Aha experience! For me, as a beginner, very detailed and uncomplicated explained. I can only recommend it! Best regards Enrico - Rated 5 out of 5
Udo
Reading this book has suddenly made my fish finders much more valuable to me! I realized that I made typical mistakes in interpreting the images, which I will now avoid. The authors use clear, understandable language and also explain the mathematical-physical basics very well. The fact that there is no advertising for one or another fish finder manufacturer has increased its credibility. At the same time, you get a solid impression of what is feasible today on this subject – and the “advertisements” of the manufacturers also helped. The book is ABSOLUTELY to recommend, because what good is an expensive fish finder if you too often draw the wrong conclusions from the obtained illustrations? In this respect, the money for the book is very well invested. - Rated 5 out of 5
Josef Weiss
I had to wait a long time for such great explanations. Thank you. - Rated 5 out of 5
Peter
It is a well-described, scientifically sound book highly recommended to anyone who wants to advance and doesn’t already know everything. - Rated 5 out of 5
Holger Just
Ich angle seit Jahren mit Echolot. Aber erstens bleibt man da irgendwann auf einer bestimmten Verständnisstufe stehen, diese konnte ich durch dieses Buch um einiges anheben. Als zweiten Aspekt mußte ich nach dem Lesen dieses Buches erkennen, dass ich durch “gefährliches Halbwissen” jahrelang Fehlinterpretationen hatte bzw. die Möglichkeiten meines Lotes nie richtig ausgenutzt habe. Also mein Fazit : Sehr empfehlenswert, die komplexen Zusammenhänge sind verständlich beschrieben. Das Buch ist ideal geeignet um sich in der angelfreien Zeit wertvolles Wissen für die folgende Saison anzueignen und beim Thema Echolot wieder uptodate zu sein. - Rated 5 out of 5
Matthias Wappler
Sehr gut!! - Rated 5 out of 5
M. Hermanns
Wer dieses Buch nicht liest, ist selber Schuld! Kein Vortrag, kein Presseartikel oder Bericht, Nein sogar keine Online-Schulung oder gar ein 365 Tage Support, vermittelt so viele essentielle Kenntnisse, wie dieses Buch. Nach zwei drei bebilderten Erklärungen wird dir klar, das ohne dieses Wissen, die Gewinn bringende Nutzung eines Echolotes gar nicht möglich ist. Beziehungsweise dir wird klar das du dein Echolot bisher sehr ineffizient genutzt hast und das dir eine Menge verborgen geblieben ist. Ich habe nach dem ersten gleich drei weitere Exemplare gekauft und drei guten Angelfreunden eine Anerkennung für unsere Freundschaft mit diesem Buch gemacht. Alle drei verfügen über 30 Jahre Bootsangelerfahrung und alle drei waren ebenfalls begeistert, jeder konnte sein Wissen deutlich erweitern. Deshalb freue ich mich auch so sehr auf das Zanderbuch welches hoffentlich noch vor dem Wochenende bei mir ist. Liebe Grüße weiter so. dermarc - Rated 5 out of 5
TACKLEFEVER
Das Buch beginnt mit rund 15 Seiten Technik Erläuterung bei der versierte Echolot Nutzer, zu denen ich mich zähle, vielleicht geneigt sind weiter zu blättern weil sie vieles schon wissen und Anfänger weiter blättern möchten weil es zu trocken scheint. Aber etwas Basiswissen gehört einfach dazu. Selbst wenn man als Anfänger bei der Basis Theorie weiter blättern will, sobald es um Chirp geht sollte “jeder” genauer hinschauen 😉 es lohnt sich. Und auch für mich fand ich noch ein zwei kleine Dinge die ich nicht wusste oder noch nicht im Zusammenhang mit anderem sah. Die weiteren Abschnitte (bis Kap. 3) befassen sich mit den verschiedenen Techniken der Geber, Bildschirme, oder dem Smartphone, dem Tablet als Anzeigemedium. Was mir bis dahin sehr positiv auffiel waren die “MERKE-Boxen”, kleine übersichtliche Passagen welche Kerninformationen des zuvor vermittelten Wissen zusammenfassend hervorheben. Auch wenn man nicht alles komplett verstanden hat, hilft diese leicht verständliche Zusammenfassung des voraus gegangenen Inhalts sehr. Kapitel 4 geht auf 2D, Down-Imaging, Side-Scan-Sonar ein, dabei ohne zu konkret auf einen Hersteller abzustellen was ich ebenfalls sehr positiv fand. Dem Angler wird der praktische Einsatz und das Verstehen dessen was man auf dem Echolot sieht erläutert. Fragen wie z.B.: Wo befindet sich der Fisch genau? Was ist eine Fischsichel? Wie setze ich das Echolot beim Vertikalangeln ein? Warum gibt es Vertiefungen obwohl man keine sieht und umgekehrt? Wie erkenne ich die Bodenbeschaffenheit? Fragen zur richtigen Deutung der Unterwasserstruktur, dem optimalen Bildlauf- und Boots- Geschwindigkeit, der Sprungschicht, usw. werden auch beantwortet. Würde ich alles aufzählen würde es hier zu weit führen. Es folgen noch kurze Infos zur Multibeam Technik und ein Kapitel “Die 3D Show mit Garmins Panoptix”. Hier wurde für mich zu wenig Wissen vermittelt, nur auf einen Herstellers gezeigt und nicht auf ähnliche Funktionen oder Techniken anderer Hersteller Bezug genommen. Ich hoffe es kommt in der nächsten Auflage mehr zu dem Thema. Am Ende des Buches kommen Infos rund um konkrete Einstellungen am Echolot. Hier wird einer der wichtigsten Punkte überhaupt behandelt und dies praxisnah und hilfreich. Aller spätestens jetzt lohnt sich das Buch für alle Neueinsteiger. Viel einfacher und kompakter geht es kaum. Ein paar wichtige zuvor besprochene Punkte zu Einstellungen bei bestimmten Echolot Funktionen werden erläutert und mit Checklisten im Kapitel “Die effektivsten Einstellungen beim Echolot auf einen Blick” zusammen gefasst. Hier lohnt es sich für Anfänger die Seiten besonders aufmerksam zu lesen und vielleicht als Kopie mit auf Boot zu nehmen. Damit fällt der Kampf mit den gefühlten tausenden von Einstellungen am Echolot auf dem Wasser leichter. Es klingt fast zu schön um wahr zu sein, aber tatsächlich scheint mir das Buch für Anfänger und Fortgeschrittene Anwender gleichermaßen gut geeignet zu sein. Manchmal suchte ich mehr Hintergrundwissen, weil der im Prinzip sehr gute Ansatz es für Anfänger leicht verständlich zu halten manche Herstellerabhängige Feinheiten außer Acht lässt. Das Buch hat eine gute Gliederung, fasst vieles kompakt zusammen und geht bei wichtigen Punkten auch meist für Fortgeschrittene etwas in die Tiefe. So richtet sich das Buch meiner Meinung nach nicht an wissenschaftliche Anwender, sondern an Echolot Neulinge indem es auch viele Basis Fragen beantwortet ebenso auch an Fortgeschrittene indem es auf diverse Punkte tiefer eingeht. Wenn ich den Sinn des Buches in einem Satz beschreiben sollte, dann wäre dies: Echolottechnik für Anfänger interessant und verständlich erklären und dabei auch ein wenig tieferes Wissen für alle zu vermitteln. Mir ist Stand Juni 2017 kein anderes Buch bekannt das diesen Ansatz so konsequent verfolgt. Ich hoffe ihr habt so viel Spaß beim lesen wie ich. Luke www.tacklefever.de
The RMS is the most important value for fish sonars, since the power cannot be fattened up artificially with high wattage values (peak to peak)!
Even medium-priced devices such as the Humminbird Helix 12 CHIRP MEGA SI GPS have a transmitting power of 1,000 watts (RMS) with legendary 8,000 watts (peak to peak).
Therefore it depends specifically on what you plan to do with the fish finder. Normally, the device automatically controls the wattage used according to depth.
- In shallow waters up to 50 m (165 ft), a low wattage of 100 watts is sufficient,
- while in deeper bodies of water the power must be fully exploited.
What is the best frequency for a fish finder?
Before we get into the functionality of CHIRP and photorealistic imaging, we need a fundamental understanding of how different frequencies work.
We’ll just do a quick overview of the subject here. If you want more comprehensive information, we recommend taking a look at our Ultimate Fish Finder Guide.
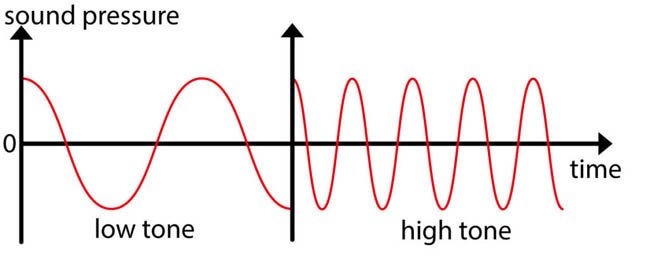
When a transducer sends a sound wave into the water, it’s called a “ping”. The sound wave (ping) is an audible tone created by a vibrating ceramic and has a specific frequency.
Most traditional fish finders operate in the sonar range with frequencies between 50 and 200 kHz.
Pro and Cons of high frequencies
A 200 kHz wavelength is significantly shorter than one at 50 kHz (ultrasonic wavelengths range from 0.3 to 1.2 in – 7.5 to 30 mm), which means that an image produced at 200 kHz will be much more detailed than one produced at 50 kHz. This is because more sound waves come into contact with the object in question and are reflected back up to the transducer.
Most anglers underestimate the effect of sound waves. The respective frequency has a big influence on the distance at which individual fish are recognized as such at all. The difference here is enormous. At 50 kHz, fish closer than 50 cm (15.7 in) to each other cannot be detected as individual fish.
This is directly dependent upon distance resolution and should be a point of interest for anyone who owns or is looking to buy a fish finder. In our book the ultimate fish finder guide, we go into great detail on the subject of distance resolution.
Individual soundwaves impact a given object much more often at higher frequencies than at lower ones. In terms of imaging, this results in much more detailed fish finder images.
Remember
If you have problems to understand how the sound waves work, take a sheet of paper and draw points on a line at a distance of 7.5 mm / 0.3 in (200 kHz). Next to it repeat the same thing with a distance of 30 mm / 1.2 in (50 kHz). Now place an object – like your key – on the points. You will see that at a distance of 7.5 mm / 0.3 in many more points hit the key than at 30 mm / 1.2 in (shorter wavelength = higher frequency at the sonar).
Pros and Cons of low frequencies
A low frequency offers advantages especially in deep waters. Since the wavelength of 50 kHz is bigger than high frequencies, the water offers less resistance and you can reach a greater depth.
In the same way, the ground conditions can be visualized better, because the sound waves can penetrate deeper into it before they are reflected by the substrate.
Among other things, this is important for fishing at big depths of more than 300 meters (1,000 ft), such as in the coastal regions of many seas.
At these depths, the sound waves of a 200 kHz frequency will often not reach the ground, so there can be no echo. As a result, the screen remains blank and shows nothing at all.
Comparison between high and low frequencies:
Let’s take a high frequency of 200 kHz and a low frequency of 83 kHz as an example.
Pros of 200 kHz:
- More detailed images and information.
- Small obstacles are detected.
- Narrow beam angles that cover the depth better.
- Fish, that are close to each other are displayed as individual fish crescents.
Cons of 200 kHz:
- The small beam angle also scans a small area.
- Any information outside of the transmission cone is not captured.
- Not suitable for big depths (150 m / 490 ft and more).
Pros of 83 kHz:
- Big area covered by the sonar (mostly 60° beam angle).
- Can be used for bigger depths.
Cons of 83 kHz:
- The information of the scanned area is not so detailed.
- Schools of fish are often only displayed as a dense cluster of dots.
- In bigger depths there is too much information, which cannot be displayed.
-
The Ultimate Fish Finder Guide
Download 40 pages for free now
Reviews ( 17 )
- Rated 5 out of 5
Raphaël G
Very effective. - Rated 5 out of 5
Vladimir M
The book describes the fish finder physics and builds up your understanding of how it actually works. I have yet to apply this knowledge with my Humminbird, but having that much of theory is extremely helpful in understanding and processing the sonar output. - Rated 5 out of 5
NICHOLAS JOHN REECY
The Deeper Guide was just what I was looking for. YouTube is full of reviews of the sonar but little in the way of education. I highly recommend for those wanting to better understand their Deeper sonar. - Rated 5 out of 5
Henrik
I am a beginner when it comes to fishing with fish finders. For me, the book has been very informative to judge the displays on the fish finder "realistically" and to recognize what limits there are when searching for fish with the fish finder. Now I know when I have to use my regular sonar and when I have to use my ClearVü or which settings I should apply to the device at which spot. I was impressed by the many illustrations, especially for understanding the functions. - Rated 5 out of 5
Dr. Manfred Marx
Very well written, so that it is understandable even for amateurs and structured concisely. - Rated 5 out of 5
Andreas Witz
An excellent book for learning about fish finders. - Rated 5 out of 5
AK
The ultimate fish finder guide is a beneficial introduction. I am excited to put into practice what I have learned. - Rated 5 out of 5
Lübbe Wolfgang
A well-written problem solver. - Rated 5 out of 5
Kalksee
The book is unmatched for understanding how a sonar/fish finder works. I was a fish arch hunter, and I suspect my fishing tactics will change. The book has clear writing, and you understand you understand a lot the first time you read it. I can only recommend it to anyone interested in technology. Thank you for this fantastic book! Thoralf - Rated 5 out of 5
Enrico Indelicato
I had absolutely no idea about fish finders. Since I read the book, I had a real Aha experience! For me, as a beginner, very detailed and uncomplicated explained. I can only recommend it! Best regards Enrico - Rated 5 out of 5
Udo
Reading this book has suddenly made my fish finders much more valuable to me! I realized that I made typical mistakes in interpreting the images, which I will now avoid. The authors use clear, understandable language and also explain the mathematical-physical basics very well. The fact that there is no advertising for one or another fish finder manufacturer has increased its credibility. At the same time, you get a solid impression of what is feasible today on this subject - and the "advertisements" of the manufacturers also helped. The book is ABSOLUTELY to recommend, because what good is an expensive fish finder if you too often draw the wrong conclusions from the obtained illustrations? In this respect, the money for the book is very well invested. - Rated 5 out of 5
Josef Weiss
I had to wait a long time for such great explanations. Thank you. - Rated 5 out of 5
Peter
It is a well-described, scientifically sound book highly recommended to anyone who wants to advance and doesn't already know everything. - Rated 5 out of 5
Holger Just
Ich angle seit Jahren mit Echolot. Aber erstens bleibt man da irgendwann auf einer bestimmten Verständnisstufe stehen, diese konnte ich durch dieses Buch um einiges anheben. Als zweiten Aspekt mußte ich nach dem Lesen dieses Buches erkennen, dass ich durch "gefährliches Halbwissen" jahrelang Fehlinterpretationen hatte bzw. die Möglichkeiten meines Lotes nie richtig ausgenutzt habe. Also mein Fazit : Sehr empfehlenswert, die komplexen Zusammenhänge sind verständlich beschrieben. Das Buch ist ideal geeignet um sich in der angelfreien Zeit wertvolles Wissen für die folgende Saison anzueignen und beim Thema Echolot wieder uptodate zu sein. - Rated 5 out of 5
Matthias Wappler
Sehr gut!! - Rated 5 out of 5
M. Hermanns
Wer dieses Buch nicht liest, ist selber Schuld! Kein Vortrag, kein Presseartikel oder Bericht, Nein sogar keine Online-Schulung oder gar ein 365 Tage Support, vermittelt so viele essentielle Kenntnisse, wie dieses Buch. Nach zwei drei bebilderten Erklärungen wird dir klar, das ohne dieses Wissen, die Gewinn bringende Nutzung eines Echolotes gar nicht möglich ist. Beziehungsweise dir wird klar das du dein Echolot bisher sehr ineffizient genutzt hast und das dir eine Menge verborgen geblieben ist. Ich habe nach dem ersten gleich drei weitere Exemplare gekauft und drei guten Angelfreunden eine Anerkennung für unsere Freundschaft mit diesem Buch gemacht. Alle drei verfügen über 30 Jahre Bootsangelerfahrung und alle drei waren ebenfalls begeistert, jeder konnte sein Wissen deutlich erweitern. Deshalb freue ich mich auch so sehr auf das Zanderbuch welches hoffentlich noch vor dem Wochenende bei mir ist. Liebe Grüße weiter so. dermarc - Rated 5 out of 5
TACKLEFEVER
Das Buch beginnt mit rund 15 Seiten Technik Erläuterung bei der versierte Echolot Nutzer, zu denen ich mich zähle, vielleicht geneigt sind weiter zu blättern weil sie vieles schon wissen und Anfänger weiter blättern möchten weil es zu trocken scheint. Aber etwas Basiswissen gehört einfach dazu. Selbst wenn man als Anfänger bei der Basis Theorie weiter blättern will, sobald es um Chirp geht sollte "jeder" genauer hinschauen 😉 es lohnt sich. Und auch für mich fand ich noch ein zwei kleine Dinge die ich nicht wusste oder noch nicht im Zusammenhang mit anderem sah. Die weiteren Abschnitte (bis Kap. 3) befassen sich mit den verschiedenen Techniken der Geber, Bildschirme, oder dem Smartphone, dem Tablet als Anzeigemedium. Was mir bis dahin sehr positiv auffiel waren die "MERKE-Boxen", kleine übersichtliche Passagen welche Kerninformationen des zuvor vermittelten Wissen zusammenfassend hervorheben. Auch wenn man nicht alles komplett verstanden hat, hilft diese leicht verständliche Zusammenfassung des voraus gegangenen Inhalts sehr. Kapitel 4 geht auf 2D, Down-Imaging, Side-Scan-Sonar ein, dabei ohne zu konkret auf einen Hersteller abzustellen was ich ebenfalls sehr positiv fand. Dem Angler wird der praktische Einsatz und das Verstehen dessen was man auf dem Echolot sieht erläutert. Fragen wie z.B.: Wo befindet sich der Fisch genau? Was ist eine Fischsichel? Wie setze ich das Echolot beim Vertikalangeln ein? Warum gibt es Vertiefungen obwohl man keine sieht und umgekehrt? Wie erkenne ich die Bodenbeschaffenheit? Fragen zur richtigen Deutung der Unterwasserstruktur, dem optimalen Bildlauf- und Boots- Geschwindigkeit, der Sprungschicht, usw. werden auch beantwortet. Würde ich alles aufzählen würde es hier zu weit führen. Es folgen noch kurze Infos zur Multibeam Technik und ein Kapitel "Die 3D Show mit Garmins Panoptix". Hier wurde für mich zu wenig Wissen vermittelt, nur auf einen Herstellers gezeigt und nicht auf ähnliche Funktionen oder Techniken anderer Hersteller Bezug genommen. Ich hoffe es kommt in der nächsten Auflage mehr zu dem Thema. Am Ende des Buches kommen Infos rund um konkrete Einstellungen am Echolot. Hier wird einer der wichtigsten Punkte überhaupt behandelt und dies praxisnah und hilfreich. Aller spätestens jetzt lohnt sich das Buch für alle Neueinsteiger. Viel einfacher und kompakter geht es kaum. Ein paar wichtige zuvor besprochene Punkte zu Einstellungen bei bestimmten Echolot Funktionen werden erläutert und mit Checklisten im Kapitel "Die effektivsten Einstellungen beim Echolot auf einen Blick" zusammen gefasst. Hier lohnt es sich für Anfänger die Seiten besonders aufmerksam zu lesen und vielleicht als Kopie mit auf Boot zu nehmen. Damit fällt der Kampf mit den gefühlten tausenden von Einstellungen am Echolot auf dem Wasser leichter. Es klingt fast zu schön um wahr zu sein, aber tatsächlich scheint mir das Buch für Anfänger und Fortgeschrittene Anwender gleichermaßen gut geeignet zu sein. Manchmal suchte ich mehr Hintergrundwissen, weil der im Prinzip sehr gute Ansatz es für Anfänger leicht verständlich zu halten manche Herstellerabhängige Feinheiten außer Acht lässt. Das Buch hat eine gute Gliederung, fasst vieles kompakt zusammen und geht bei wichtigen Punkten auch meist für Fortgeschrittene etwas in die Tiefe. So richtet sich das Buch meiner Meinung nach nicht an wissenschaftliche Anwender, sondern an Echolot Neulinge indem es auch viele Basis Fragen beantwortet ebenso auch an Fortgeschrittene indem es auf diverse Punkte tiefer eingeht. Wenn ich den Sinn des Buches in einem Satz beschreiben sollte, dann wäre dies: Echolottechnik für Anfänger interessant und verständlich erklären und dabei auch ein wenig tieferes Wissen für alle zu vermitteln. Mir ist Stand Juni 2017 kein anderes Buch bekannt das diesen Ansatz so konsequent verfolgt. Ich hoffe ihr habt so viel Spaß beim lesen wie ich. Luke www.tacklefever.de
What is the best beam angle for a sonar transducer?
The transducer is responsible for the frequency transmitted and the beam angle of the resulting sound waves. Put another way, at what angle do the soundwaves leave the transducer? The ceramic bonded to the transducer is usually round and coated on two sides with an electrically conductive material. A ceramic designed for 200 kHz / 20° has a diameter of 1 inch (2.5 mm).These ceramics get smaller every year, but their miniaturization is ultimately limited by the laws of physics.
How does a transducer crystal look like - and what practical difference do different size aperture angles make?
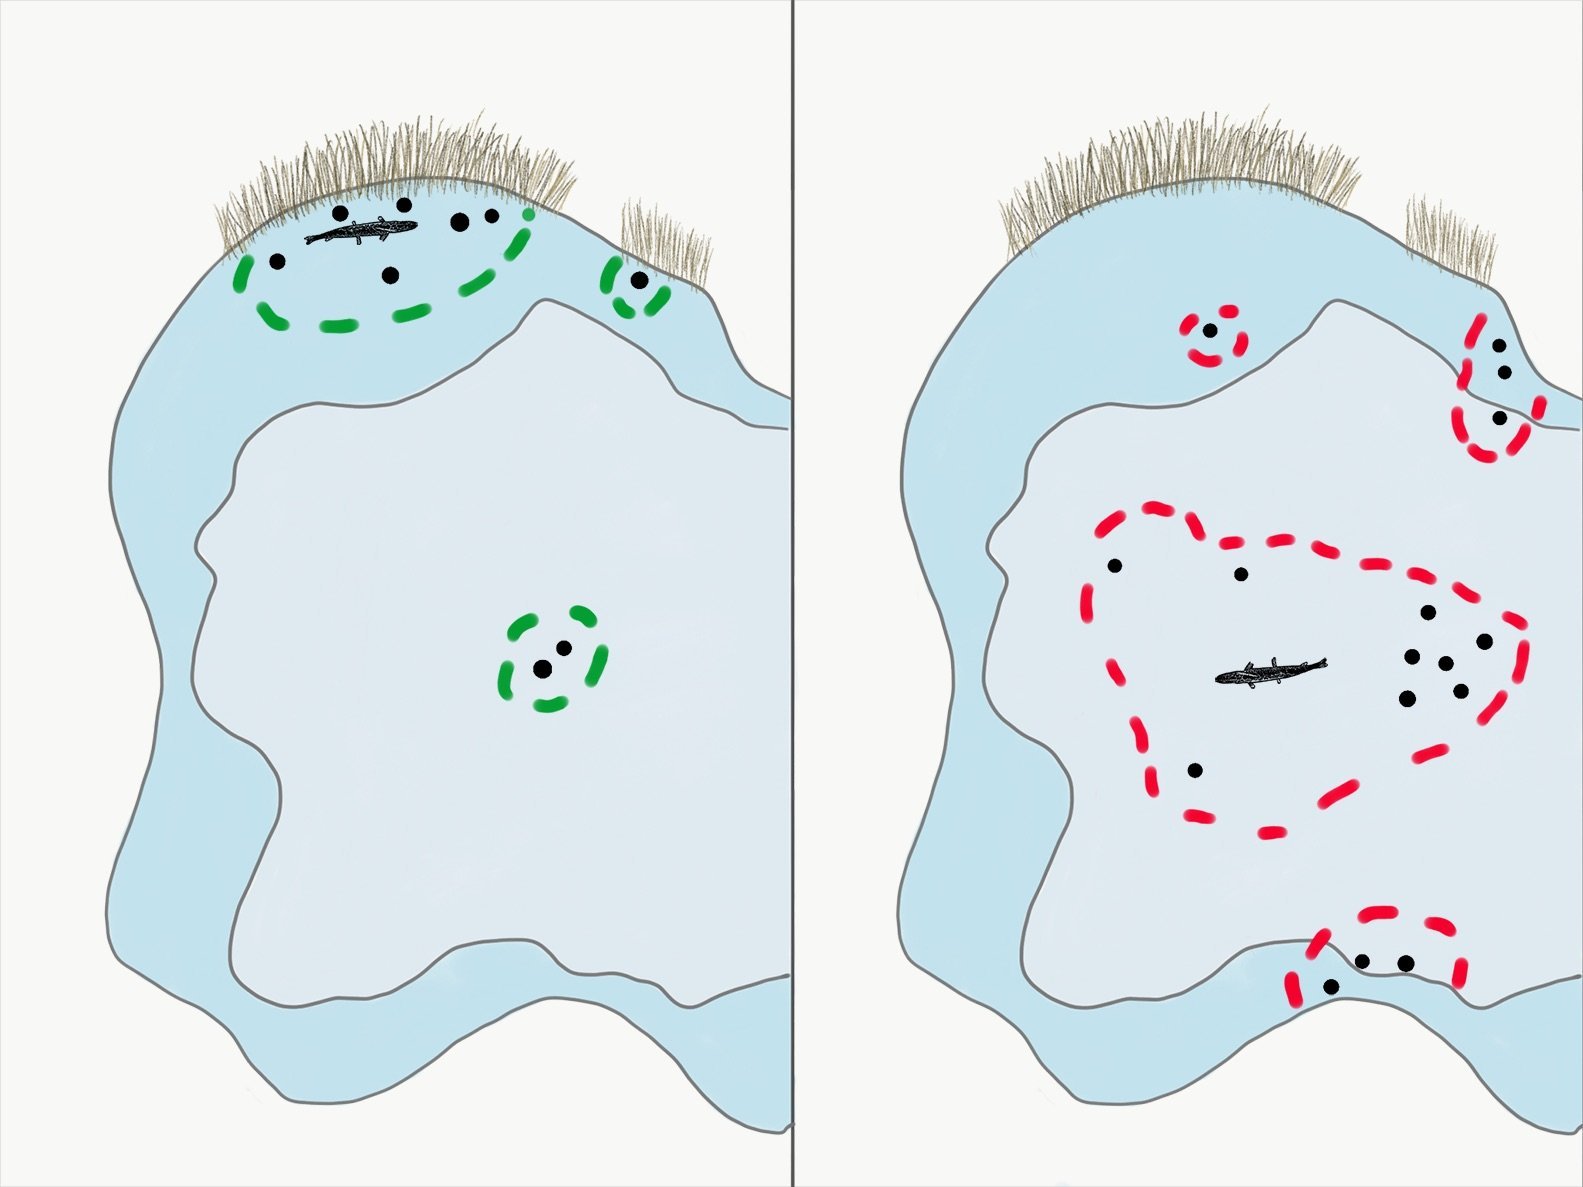
Many common fish finders operate at a frequency of 200 kHz and have an beam angle of 20° to 28°.
At a depth of 33 ft (10 m), soundwaves emitted at a 20° beam angle hit the bottom with a diameter of 11.5 ft (3.5 m), which equates to a surface area of about 100 sqft (9 sqm).
For reference, 100 sqft (9 sqm) is roughly the size of a small bathroom. At a depth of 33 ft (10 m), a ceramic with a beam angle of 60° produces a sound wave that enlarges to 38 ft (11.5 m) in diameter by the time it reaches the ground.
This means that the fish finder scans an area of 1120 sqft (104 sqm) – roughly equivalent to the area of a large apartment. Let’s take the opportunity to put these numbers into clearer perspective.
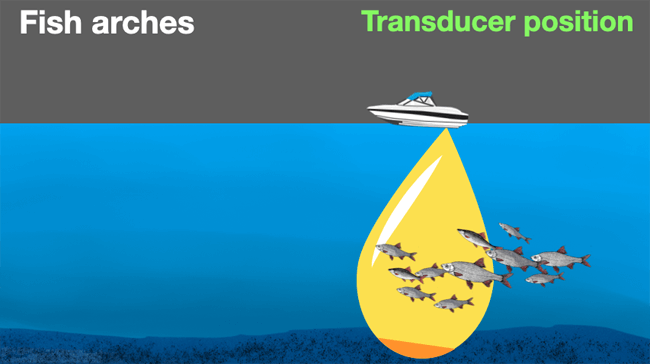
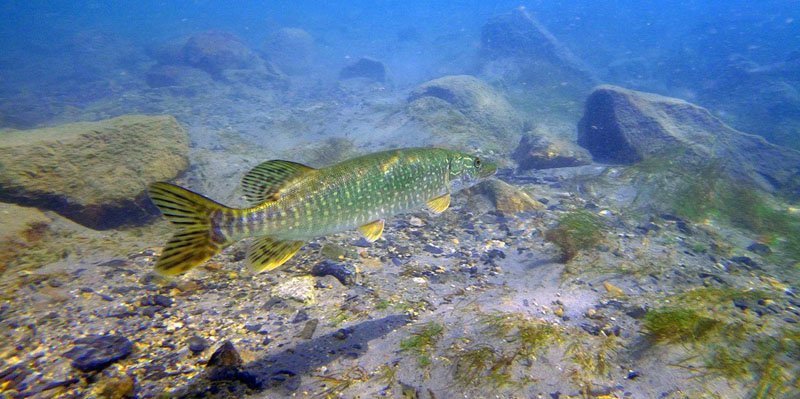
Imagine a 1120 sqft (104 sqm) apartment on the second floor of a building. There’s a big pike or bass located in that apartment’s kitchen. Your fish finder is located on the fifth floor, pinging and relaying the resulting image to you above the water.
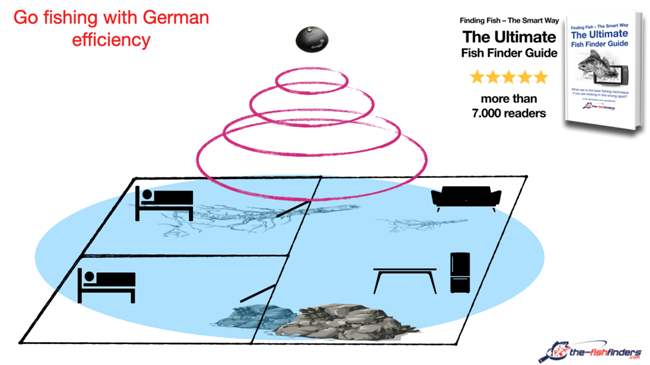
A fish: 33 feet (10 meters) down in the water
Whoa! The depth finder display is showing a large fish arch at a depth of 33 ft (10 m).
- What to do now?
- Get out your best bait and cast?
No: Hold on a minute – we only know that the fish is located in 33 ft (10 m) depth. However, the fish finder can’t tell us if it’s in the kitchen, the bathroom or some corner of the living room.
We’d have to cast in multiple directions and hope that we happen to land somewhere in the vicinity of the fish, we would like to catch. And that it furthermore happens to be in the mood to feed at just that moment.
Choosing the right frequency and beam angle is therefore incredibly important. If you want to get out on the water, find fish and *BAM* hook a three-feet-pike, you should know that a high-quality fish finder isn’t enough on its own.
Depth sounder systems are often misinterpreted in terms of their complexity and physical limitations.
How to use multiple frequencies at the same time?
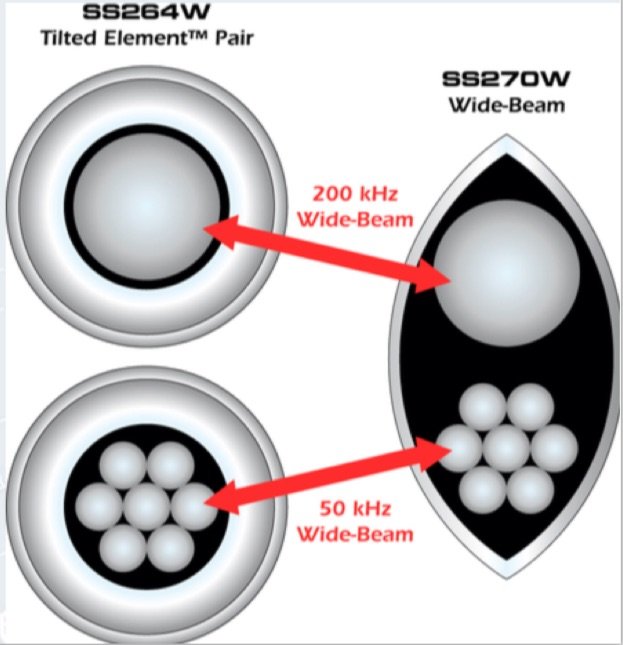
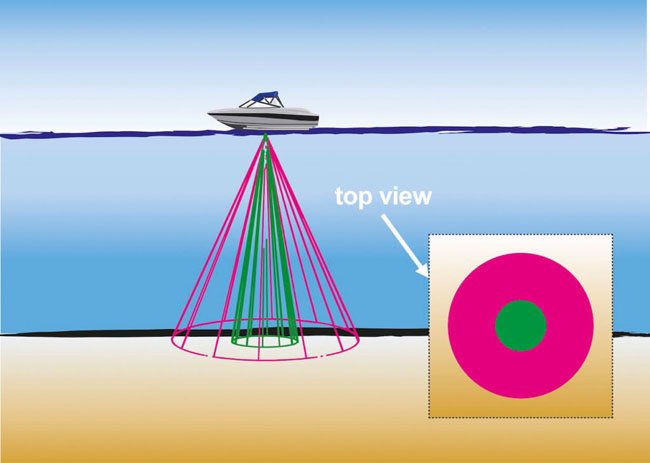
Depending on its design the crystal of the transducer can support multiple frequencies – and sometimes even multiple aperture angles. One common depth finder transducer configuration is
- to have a 200 kHz signal transmitted at a narrow angle
- and a 83 kHz signal transmitted at a wide angle.
The benefit of this configuration is that the 200 kHz signal delivers detailed images from the area under the boat, while the 83 kHz signal scans fish in a wide area around the boat. You get a nice, panoramic view of what’s going on underwater. For example, Hummingbird fish finders allow you to display the frequencies separately on-screen.
It’s truly beneficial to be able to distinguish which signals are coming from under the boat and which fish arches are likely being produced by far-off fish (excerpt from The Ultimate Fish Finder Guide page 80 – Pros and cons of wide and narrow transduction cones)!
What is the Dual Beam function of a fish finder?
The Dual Beam function allows you to combine the signals of both frequencies (at differing beam angles) in one on-screen image. A fish finder with Dual Beam is great for beginners, as they provide a great deal of information in one place and won’t confuse you with too many different imaging modes.
If you want a more sophisticated and varied fish finder experience, individual frequency imaging modes and beam angles are the way to go.
Remember
Dual Beam is a great solution for trolling, because it combines the benefits of both frequencies and partially eliminates their respective drawbacks. The simultaneous, divided display of both frequencies would be the best configuration for its use.
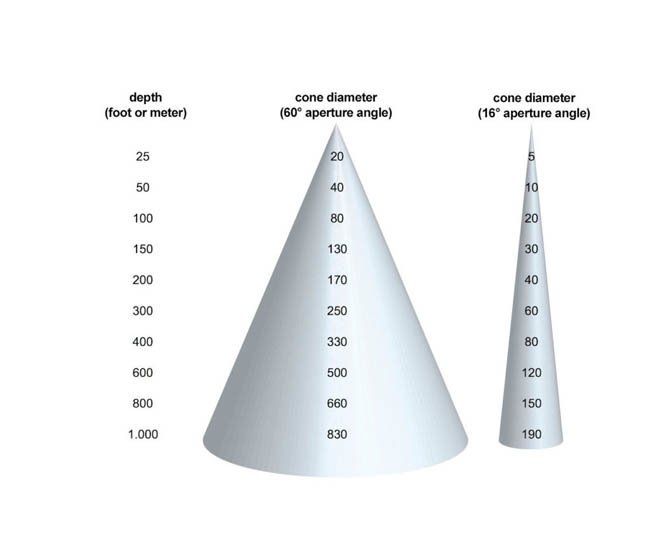
Beam angle and scanned diameter
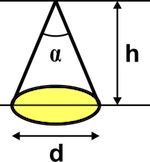
The following table shows you how to approximate the scanned diameter of your fish sonar. You can use this information to determine the area currently being displayed on it’s screen. The area covered by tit’s sound waves is calculated as follows:
(Diameter) d = 2 * tan(α/2) * h (depth)
| Depth | Transduction cone diameter at 20° aperture angle | Transduction cone diameter at 60° aperture angle |
|---|---|---|
| 16 ft / 5 m | 5.74 ft / 1.75 m | 18.9 ft / 5.75 m |
| 33 ft / 10 m | 11.5 ft / 3.5 m | 37.7 ft / 11.5 m |
| 66 ft / 20 m | 23 ft / 7 m | 75.5 ft / 23 m |
| 100 ft / 30 m | 34.5 ft / 10.5 m | 113,2 ft / 34.5 m |
-
The Ultimate Fish Finder Guide
Download 40 pages for free now
Reviews ( 17 )
- Rated 5 out of 5
Raphaël G
Very effective. - Rated 5 out of 5
Vladimir M
The book describes the fish finder physics and builds up your understanding of how it actually works. I have yet to apply this knowledge with my Humminbird, but having that much of theory is extremely helpful in understanding and processing the sonar output. - Rated 5 out of 5
NICHOLAS JOHN REECY
The Deeper Guide was just what I was looking for. YouTube is full of reviews of the sonar but little in the way of education. I highly recommend for those wanting to better understand their Deeper sonar. - Rated 5 out of 5
Henrik
I am a beginner when it comes to fishing with fish finders. For me, the book has been very informative to judge the displays on the fish finder "realistically" and to recognize what limits there are when searching for fish with the fish finder. Now I know when I have to use my regular sonar and when I have to use my ClearVü or which settings I should apply to the device at which spot. I was impressed by the many illustrations, especially for understanding the functions. - Rated 5 out of 5
Dr. Manfred Marx
Very well written, so that it is understandable even for amateurs and structured concisely. - Rated 5 out of 5
Andreas Witz
An excellent book for learning about fish finders. - Rated 5 out of 5
AK
The ultimate fish finder guide is a beneficial introduction. I am excited to put into practice what I have learned. - Rated 5 out of 5
Lübbe Wolfgang
A well-written problem solver. - Rated 5 out of 5
Kalksee
The book is unmatched for understanding how a sonar/fish finder works. I was a fish arch hunter, and I suspect my fishing tactics will change. The book has clear writing, and you understand you understand a lot the first time you read it. I can only recommend it to anyone interested in technology. Thank you for this fantastic book! Thoralf - Rated 5 out of 5
Enrico Indelicato
I had absolutely no idea about fish finders. Since I read the book, I had a real Aha experience! For me, as a beginner, very detailed and uncomplicated explained. I can only recommend it! Best regards Enrico - Rated 5 out of 5
Udo
Reading this book has suddenly made my fish finders much more valuable to me! I realized that I made typical mistakes in interpreting the images, which I will now avoid. The authors use clear, understandable language and also explain the mathematical-physical basics very well. The fact that there is no advertising for one or another fish finder manufacturer has increased its credibility. At the same time, you get a solid impression of what is feasible today on this subject - and the "advertisements" of the manufacturers also helped. The book is ABSOLUTELY to recommend, because what good is an expensive fish finder if you too often draw the wrong conclusions from the obtained illustrations? In this respect, the money for the book is very well invested. - Rated 5 out of 5
Josef Weiss
I had to wait a long time for such great explanations. Thank you. - Rated 5 out of 5
Peter
It is a well-described, scientifically sound book highly recommended to anyone who wants to advance and doesn't already know everything. - Rated 5 out of 5
Holger Just
Ich angle seit Jahren mit Echolot. Aber erstens bleibt man da irgendwann auf einer bestimmten Verständnisstufe stehen, diese konnte ich durch dieses Buch um einiges anheben. Als zweiten Aspekt mußte ich nach dem Lesen dieses Buches erkennen, dass ich durch "gefährliches Halbwissen" jahrelang Fehlinterpretationen hatte bzw. die Möglichkeiten meines Lotes nie richtig ausgenutzt habe. Also mein Fazit : Sehr empfehlenswert, die komplexen Zusammenhänge sind verständlich beschrieben. Das Buch ist ideal geeignet um sich in der angelfreien Zeit wertvolles Wissen für die folgende Saison anzueignen und beim Thema Echolot wieder uptodate zu sein. - Rated 5 out of 5
Matthias Wappler
Sehr gut!! - Rated 5 out of 5
M. Hermanns
Wer dieses Buch nicht liest, ist selber Schuld! Kein Vortrag, kein Presseartikel oder Bericht, Nein sogar keine Online-Schulung oder gar ein 365 Tage Support, vermittelt so viele essentielle Kenntnisse, wie dieses Buch. Nach zwei drei bebilderten Erklärungen wird dir klar, das ohne dieses Wissen, die Gewinn bringende Nutzung eines Echolotes gar nicht möglich ist. Beziehungsweise dir wird klar das du dein Echolot bisher sehr ineffizient genutzt hast und das dir eine Menge verborgen geblieben ist. Ich habe nach dem ersten gleich drei weitere Exemplare gekauft und drei guten Angelfreunden eine Anerkennung für unsere Freundschaft mit diesem Buch gemacht. Alle drei verfügen über 30 Jahre Bootsangelerfahrung und alle drei waren ebenfalls begeistert, jeder konnte sein Wissen deutlich erweitern. Deshalb freue ich mich auch so sehr auf das Zanderbuch welches hoffentlich noch vor dem Wochenende bei mir ist. Liebe Grüße weiter so. dermarc - Rated 5 out of 5
TACKLEFEVER
Das Buch beginnt mit rund 15 Seiten Technik Erläuterung bei der versierte Echolot Nutzer, zu denen ich mich zähle, vielleicht geneigt sind weiter zu blättern weil sie vieles schon wissen und Anfänger weiter blättern möchten weil es zu trocken scheint. Aber etwas Basiswissen gehört einfach dazu. Selbst wenn man als Anfänger bei der Basis Theorie weiter blättern will, sobald es um Chirp geht sollte "jeder" genauer hinschauen 😉 es lohnt sich. Und auch für mich fand ich noch ein zwei kleine Dinge die ich nicht wusste oder noch nicht im Zusammenhang mit anderem sah. Die weiteren Abschnitte (bis Kap. 3) befassen sich mit den verschiedenen Techniken der Geber, Bildschirme, oder dem Smartphone, dem Tablet als Anzeigemedium. Was mir bis dahin sehr positiv auffiel waren die "MERKE-Boxen", kleine übersichtliche Passagen welche Kerninformationen des zuvor vermittelten Wissen zusammenfassend hervorheben. Auch wenn man nicht alles komplett verstanden hat, hilft diese leicht verständliche Zusammenfassung des voraus gegangenen Inhalts sehr. Kapitel 4 geht auf 2D, Down-Imaging, Side-Scan-Sonar ein, dabei ohne zu konkret auf einen Hersteller abzustellen was ich ebenfalls sehr positiv fand. Dem Angler wird der praktische Einsatz und das Verstehen dessen was man auf dem Echolot sieht erläutert. Fragen wie z.B.: Wo befindet sich der Fisch genau? Was ist eine Fischsichel? Wie setze ich das Echolot beim Vertikalangeln ein? Warum gibt es Vertiefungen obwohl man keine sieht und umgekehrt? Wie erkenne ich die Bodenbeschaffenheit? Fragen zur richtigen Deutung der Unterwasserstruktur, dem optimalen Bildlauf- und Boots- Geschwindigkeit, der Sprungschicht, usw. werden auch beantwortet. Würde ich alles aufzählen würde es hier zu weit führen. Es folgen noch kurze Infos zur Multibeam Technik und ein Kapitel "Die 3D Show mit Garmins Panoptix". Hier wurde für mich zu wenig Wissen vermittelt, nur auf einen Herstellers gezeigt und nicht auf ähnliche Funktionen oder Techniken anderer Hersteller Bezug genommen. Ich hoffe es kommt in der nächsten Auflage mehr zu dem Thema. Am Ende des Buches kommen Infos rund um konkrete Einstellungen am Echolot. Hier wird einer der wichtigsten Punkte überhaupt behandelt und dies praxisnah und hilfreich. Aller spätestens jetzt lohnt sich das Buch für alle Neueinsteiger. Viel einfacher und kompakter geht es kaum. Ein paar wichtige zuvor besprochene Punkte zu Einstellungen bei bestimmten Echolot Funktionen werden erläutert und mit Checklisten im Kapitel "Die effektivsten Einstellungen beim Echolot auf einen Blick" zusammen gefasst. Hier lohnt es sich für Anfänger die Seiten besonders aufmerksam zu lesen und vielleicht als Kopie mit auf Boot zu nehmen. Damit fällt der Kampf mit den gefühlten tausenden von Einstellungen am Echolot auf dem Wasser leichter. Es klingt fast zu schön um wahr zu sein, aber tatsächlich scheint mir das Buch für Anfänger und Fortgeschrittene Anwender gleichermaßen gut geeignet zu sein. Manchmal suchte ich mehr Hintergrundwissen, weil der im Prinzip sehr gute Ansatz es für Anfänger leicht verständlich zu halten manche Herstellerabhängige Feinheiten außer Acht lässt. Das Buch hat eine gute Gliederung, fasst vieles kompakt zusammen und geht bei wichtigen Punkten auch meist für Fortgeschrittene etwas in die Tiefe. So richtet sich das Buch meiner Meinung nach nicht an wissenschaftliche Anwender, sondern an Echolot Neulinge indem es auch viele Basis Fragen beantwortet ebenso auch an Fortgeschrittene indem es auf diverse Punkte tiefer eingeht. Wenn ich den Sinn des Buches in einem Satz beschreiben sollte, dann wäre dies: Echolottechnik für Anfänger interessant und verständlich erklären und dabei auch ein wenig tieferes Wissen für alle zu vermitteln. Mir ist Stand Juni 2017 kein anderes Buch bekannt das diesen Ansatz so konsequent verfolgt. Ich hoffe ihr habt so viel Spaß beim lesen wie ich. Luke www.tacklefever.de
How is a fish crescent created by a fish sonar?
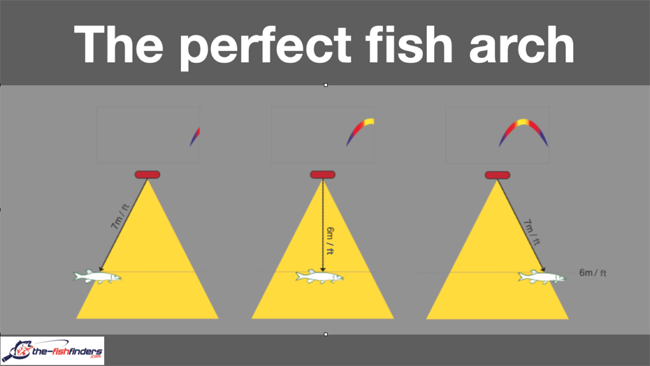
- A fish enters the beam angle – and subsequently the distance from the fish to the transducer is measured. The signal is then continuously interpreted and displayed.
- Then the fish moves into the direction of the boat, effectively shortening the distance to the transducer. Its image moves upward, with its peak indicating its true depth (in other words, its closest position relative to the transducer).
- The fish then slowly leaves the sonar cone and moves away from the boat. The distance increases again, and the displayed points move downward.
Such a complete transit through the sonar cone creates a single (and complete) fish crescent.
The perfect fish arch however is a rarity
Much more often, fish wander around in the transduction cone or move along the length of the boat. Each of these circumstances cause different types of fish arches to be displayed on your depth finder.
They might have a particularly thick or thin side, or one end of it might be missing altogether. Additionally, arches might stack up on one another.
You therefore have to ask yourself a number of questions:
- Which ones are predators, and which ones are prey?
- If the large arches are predatory fish, how do I catch them?
- Are they located to the right or the left of my boat?
Even the simple question of a given fish’s depth requires some interpretation, as it can’t simply be taken from the depth scale on your display.
How to interpret fish finder images
- The task at hand: Interpret the fish arches displayed on your sonar screen – and decide based on that interpretation, whether the fishing spot is worth the effort.
- Note: The importance of the speed, with which the boat moves is often underestimated, nevertheless does it influence the size (and form) of the fish arches.
A lot of fish finder owners tell us that they stroll around until they can see nice, fat fish crescents on their displays. Only then do they stop and start fishing. We however believe this is one of the primary reasons that fuel – and potential fishing time – is wasted. The upshot is that you spend less time actually catching fish.
Fish sickles are fine, but ground imaging is even more important: It is this information that can reveal truly promising fishing spots. A quality fishing spot is what leads to success in the sport, and it’s the thing that separates the winners from the losers.
FYI:
Finding fish is definitely an exciting topic, but it’s so broad that we’ve dedicated two whole chapters of our book to it (chapters 4 and 7). Have a quick look here to check it out. You can download over 20 pages for free.
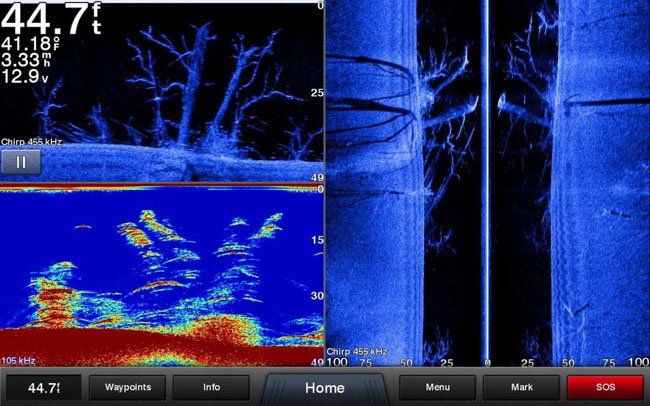
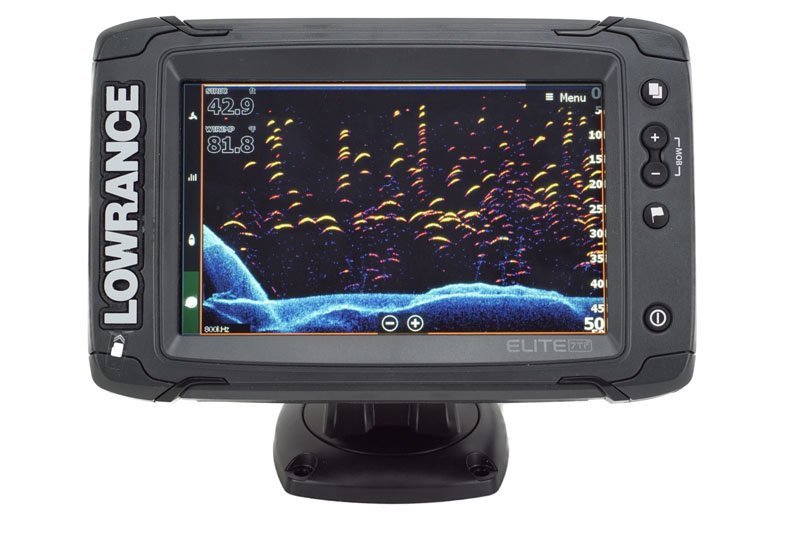
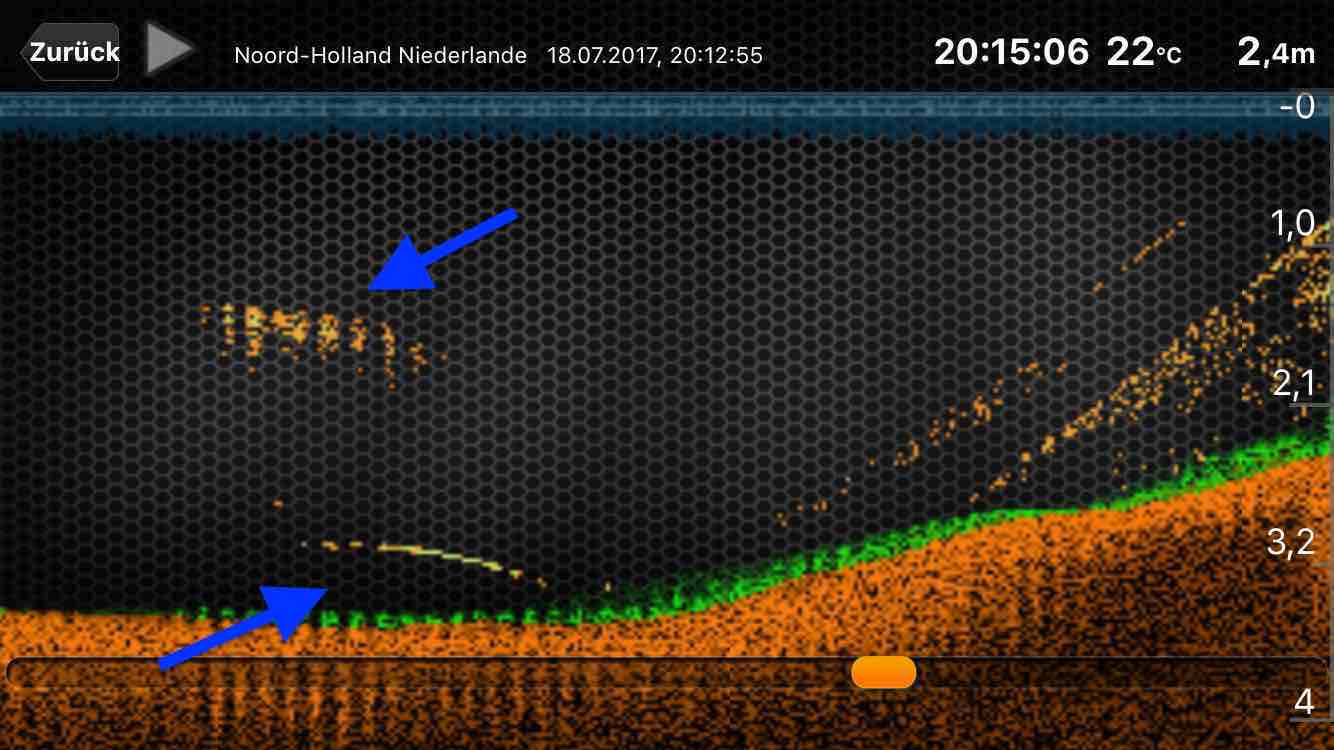
What can you see on a fish finder’s screen?
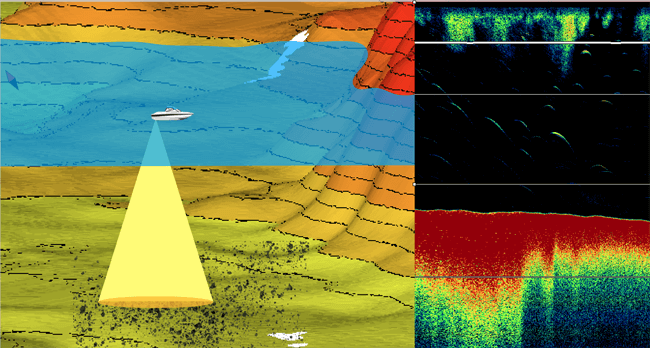
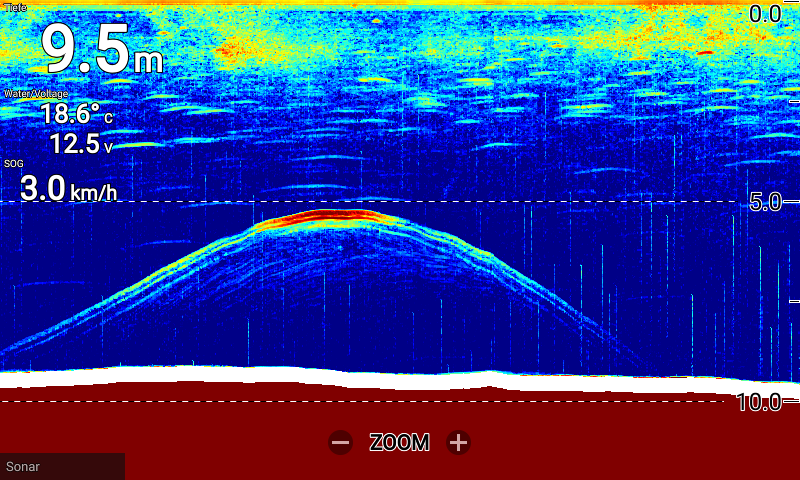
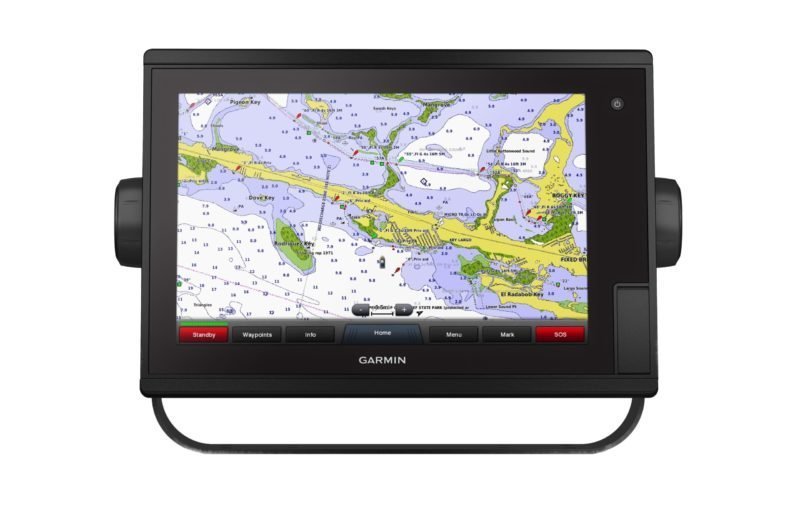
How to read a fish finder? Its images are always read from right to left. In the following picture, you can see a traditional 2D sonar. This means that the information is gathered by a conical sound wave field and subsequently processed and displayed. What you see on-screen is already in the past. The most recent information is always located on the far right side of the screen.
Real-time information (on what is presently in the transduction cone) is displayed exclusively in the A-Scope or RTS readout, assuming you have them activated on your depth finder.
We personally never fish without this readout!
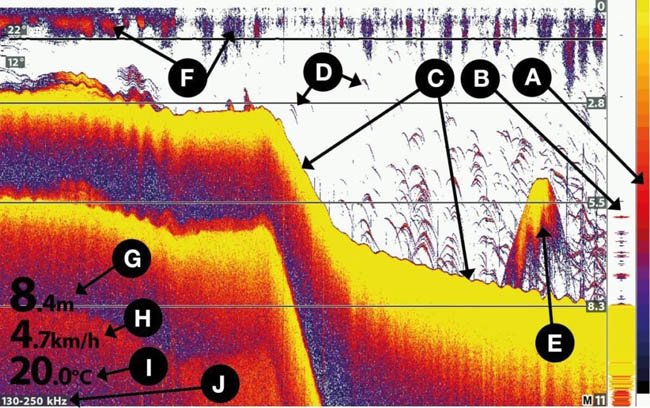
The display of a fish sonar is divided into the following information sets:
A. Color scale (yellow = strongest echo, dark blue = weakest echo)
B. Setting-dependent (A-Scope or RTS)
C. Ground line
D. Individual fish
E. School of fish
F. Surface disruptions
G. Current water depth
H. Current boat speed (km/h or mph)
I. Current water temperature (°C or °F)
J. Current transducer frequency
What is CHIRP and is it worth it?
Conventional transducers emit sequential soundwaves of a single frequency and convert the returning echoes into an image. Things are different with CHIRP. Here, the transducer simultaneously emits multiple soundwaves of differing frequencies and analyzes the returning echoes. The higher frequencies are more sensitive, while the lower ones penetrate farther into the depths. Taken together, they create a much more detailed image. CHIRP stands for Compressed High-Intensity Radiated Pulse, and it represents the state-of-the-art when it comes to depth finder technology.

How does the Down- and SideScan sonar work?
The higher the frequency, the more detailed the result: Due to that reason modern fish finders can produce photo-realistic images.
What are DownScan Imaging, Down Imaging, ClearVü and DownVision?
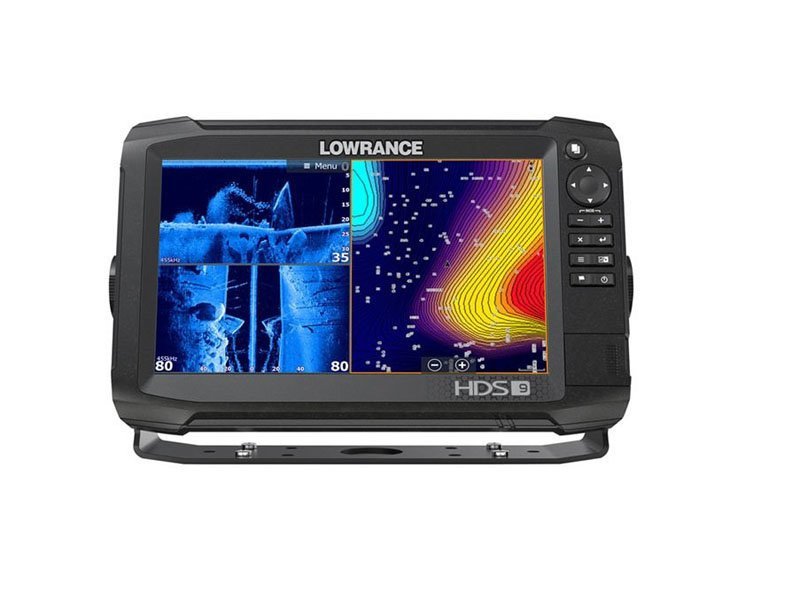
- DownScan Imaging (Lowrance fish finders)
- Down Imaging (Humminbird fish finders)
- ClearVü (Garmin fish finders, DownVü until 2016)
- DownVision (Raymarine fish finders)
What are StructureScan, Side Imaging, SideVü and SideVision?
- StructureScan Imaging (Lowrance)
- Side Imaging (Humminbird)
- SideVü (Garmin, DownVü until 2016)
- SideVision (Raymarine)
How to maintain a fish finder?
If the display is ever damaged, you often won’t get away without paying dearly to repair it. Sometimes, repair isn’t even an option – in those cases, you simply have to buy a new one.
When should I replace my transducer?
Under normal use conditions (regular fishing trips from spring to fall), a plastic transducer should last approximately 6 to 8 years. After that point, its performance will diminish noticeably. You most likely won’t notice this at first, because the image details deteriorate little by little. Therefore it’s hard to make a comparison, as you probably won’t have a record of the image quality from when you first bought the depth finder.
We always use the following tried-and-true method: Right after you get a new fish finder, switch all automatic settings over to manual. Then
- Make notes of these settings and
- take a photo of the display.
After (at most) 5 years, set the device up in the same way and get that photo out – it will be easy to tell if the image quality has changed.
Incidentally, if the image quality has diminished, you’ll have the perfect argument to present to your better half as to why you need to buy a new depth finder or transducer!
Does a fish finder insurance exist?
Depth finders are an ideal target for thieves. As on one hand they are easy to steal and on the other they bring in plenty of cash on the second-hand market. Especially, if they are rather new or equipped with a large screen. Unfortunately, you can’t insure a depth finder on its own.
However, they are covered by your boat (or boathouse) general liability insurance. In cases of break-in/theft or damage during the course of a break-in, your insurance will pay out according to the conditions of your policy. For a claim to be acknowledged, the depth finder and other electronic components need to be registered as inventory with your insurance company. Additionally, you should always make sure to keep your purchase receipt in a safe place.
If you have an expensive transducer, you furthermore have to report any instance of ground contact with your insurer. If the transducer breaks at some later date – and the failure can be traced back to an unregistered instance of ground contact – the insurer will not accept your claim because you are required to report any possible damage as soon as possible after it happens.
-
The Ultimate Fish Finder Guide
Download 40 pages for free now
Reviews ( 17 )
- Rated 5 out of 5
Raphaël G
Very effective. - Rated 5 out of 5
Vladimir M
The book describes the fish finder physics and builds up your understanding of how it actually works. I have yet to apply this knowledge with my Humminbird, but having that much of theory is extremely helpful in understanding and processing the sonar output. - Rated 5 out of 5
NICHOLAS JOHN REECY
The Deeper Guide was just what I was looking for. YouTube is full of reviews of the sonar but little in the way of education. I highly recommend for those wanting to better understand their Deeper sonar. - Rated 5 out of 5
Henrik
I am a beginner when it comes to fishing with fish finders. For me, the book has been very informative to judge the displays on the fish finder "realistically" and to recognize what limits there are when searching for fish with the fish finder. Now I know when I have to use my regular sonar and when I have to use my ClearVü or which settings I should apply to the device at which spot. I was impressed by the many illustrations, especially for understanding the functions. - Rated 5 out of 5
Dr. Manfred Marx
Very well written, so that it is understandable even for amateurs and structured concisely. - Rated 5 out of 5
Andreas Witz
An excellent book for learning about fish finders. - Rated 5 out of 5
AK
The ultimate fish finder guide is a beneficial introduction. I am excited to put into practice what I have learned. - Rated 5 out of 5
Lübbe Wolfgang
A well-written problem solver. - Rated 5 out of 5
Kalksee
The book is unmatched for understanding how a sonar/fish finder works. I was a fish arch hunter, and I suspect my fishing tactics will change. The book has clear writing, and you understand you understand a lot the first time you read it. I can only recommend it to anyone interested in technology. Thank you for this fantastic book! Thoralf - Rated 5 out of 5
Enrico Indelicato
I had absolutely no idea about fish finders. Since I read the book, I had a real Aha experience! For me, as a beginner, very detailed and uncomplicated explained. I can only recommend it! Best regards Enrico - Rated 5 out of 5
Udo
Reading this book has suddenly made my fish finders much more valuable to me! I realized that I made typical mistakes in interpreting the images, which I will now avoid. The authors use clear, understandable language and also explain the mathematical-physical basics very well. The fact that there is no advertising for one or another fish finder manufacturer has increased its credibility. At the same time, you get a solid impression of what is feasible today on this subject - and the "advertisements" of the manufacturers also helped. The book is ABSOLUTELY to recommend, because what good is an expensive fish finder if you too often draw the wrong conclusions from the obtained illustrations? In this respect, the money for the book is very well invested. - Rated 5 out of 5
Josef Weiss
I had to wait a long time for such great explanations. Thank you. - Rated 5 out of 5
Peter
It is a well-described, scientifically sound book highly recommended to anyone who wants to advance and doesn't already know everything. - Rated 5 out of 5
Holger Just
Ich angle seit Jahren mit Echolot. Aber erstens bleibt man da irgendwann auf einer bestimmten Verständnisstufe stehen, diese konnte ich durch dieses Buch um einiges anheben. Als zweiten Aspekt mußte ich nach dem Lesen dieses Buches erkennen, dass ich durch "gefährliches Halbwissen" jahrelang Fehlinterpretationen hatte bzw. die Möglichkeiten meines Lotes nie richtig ausgenutzt habe. Also mein Fazit : Sehr empfehlenswert, die komplexen Zusammenhänge sind verständlich beschrieben. Das Buch ist ideal geeignet um sich in der angelfreien Zeit wertvolles Wissen für die folgende Saison anzueignen und beim Thema Echolot wieder uptodate zu sein. - Rated 5 out of 5
Matthias Wappler
Sehr gut!! - Rated 5 out of 5
M. Hermanns
Wer dieses Buch nicht liest, ist selber Schuld! Kein Vortrag, kein Presseartikel oder Bericht, Nein sogar keine Online-Schulung oder gar ein 365 Tage Support, vermittelt so viele essentielle Kenntnisse, wie dieses Buch. Nach zwei drei bebilderten Erklärungen wird dir klar, das ohne dieses Wissen, die Gewinn bringende Nutzung eines Echolotes gar nicht möglich ist. Beziehungsweise dir wird klar das du dein Echolot bisher sehr ineffizient genutzt hast und das dir eine Menge verborgen geblieben ist. Ich habe nach dem ersten gleich drei weitere Exemplare gekauft und drei guten Angelfreunden eine Anerkennung für unsere Freundschaft mit diesem Buch gemacht. Alle drei verfügen über 30 Jahre Bootsangelerfahrung und alle drei waren ebenfalls begeistert, jeder konnte sein Wissen deutlich erweitern. Deshalb freue ich mich auch so sehr auf das Zanderbuch welches hoffentlich noch vor dem Wochenende bei mir ist. Liebe Grüße weiter so. dermarc - Rated 5 out of 5
TACKLEFEVER
Das Buch beginnt mit rund 15 Seiten Technik Erläuterung bei der versierte Echolot Nutzer, zu denen ich mich zähle, vielleicht geneigt sind weiter zu blättern weil sie vieles schon wissen und Anfänger weiter blättern möchten weil es zu trocken scheint. Aber etwas Basiswissen gehört einfach dazu. Selbst wenn man als Anfänger bei der Basis Theorie weiter blättern will, sobald es um Chirp geht sollte "jeder" genauer hinschauen 😉 es lohnt sich. Und auch für mich fand ich noch ein zwei kleine Dinge die ich nicht wusste oder noch nicht im Zusammenhang mit anderem sah. Die weiteren Abschnitte (bis Kap. 3) befassen sich mit den verschiedenen Techniken der Geber, Bildschirme, oder dem Smartphone, dem Tablet als Anzeigemedium. Was mir bis dahin sehr positiv auffiel waren die "MERKE-Boxen", kleine übersichtliche Passagen welche Kerninformationen des zuvor vermittelten Wissen zusammenfassend hervorheben. Auch wenn man nicht alles komplett verstanden hat, hilft diese leicht verständliche Zusammenfassung des voraus gegangenen Inhalts sehr. Kapitel 4 geht auf 2D, Down-Imaging, Side-Scan-Sonar ein, dabei ohne zu konkret auf einen Hersteller abzustellen was ich ebenfalls sehr positiv fand. Dem Angler wird der praktische Einsatz und das Verstehen dessen was man auf dem Echolot sieht erläutert. Fragen wie z.B.: Wo befindet sich der Fisch genau? Was ist eine Fischsichel? Wie setze ich das Echolot beim Vertikalangeln ein? Warum gibt es Vertiefungen obwohl man keine sieht und umgekehrt? Wie erkenne ich die Bodenbeschaffenheit? Fragen zur richtigen Deutung der Unterwasserstruktur, dem optimalen Bildlauf- und Boots- Geschwindigkeit, der Sprungschicht, usw. werden auch beantwortet. Würde ich alles aufzählen würde es hier zu weit führen. Es folgen noch kurze Infos zur Multibeam Technik und ein Kapitel "Die 3D Show mit Garmins Panoptix". Hier wurde für mich zu wenig Wissen vermittelt, nur auf einen Herstellers gezeigt und nicht auf ähnliche Funktionen oder Techniken anderer Hersteller Bezug genommen. Ich hoffe es kommt in der nächsten Auflage mehr zu dem Thema. Am Ende des Buches kommen Infos rund um konkrete Einstellungen am Echolot. Hier wird einer der wichtigsten Punkte überhaupt behandelt und dies praxisnah und hilfreich. Aller spätestens jetzt lohnt sich das Buch für alle Neueinsteiger. Viel einfacher und kompakter geht es kaum. Ein paar wichtige zuvor besprochene Punkte zu Einstellungen bei bestimmten Echolot Funktionen werden erläutert und mit Checklisten im Kapitel "Die effektivsten Einstellungen beim Echolot auf einen Blick" zusammen gefasst. Hier lohnt es sich für Anfänger die Seiten besonders aufmerksam zu lesen und vielleicht als Kopie mit auf Boot zu nehmen. Damit fällt der Kampf mit den gefühlten tausenden von Einstellungen am Echolot auf dem Wasser leichter. Es klingt fast zu schön um wahr zu sein, aber tatsächlich scheint mir das Buch für Anfänger und Fortgeschrittene Anwender gleichermaßen gut geeignet zu sein. Manchmal suchte ich mehr Hintergrundwissen, weil der im Prinzip sehr gute Ansatz es für Anfänger leicht verständlich zu halten manche Herstellerabhängige Feinheiten außer Acht lässt. Das Buch hat eine gute Gliederung, fasst vieles kompakt zusammen und geht bei wichtigen Punkten auch meist für Fortgeschrittene etwas in die Tiefe. So richtet sich das Buch meiner Meinung nach nicht an wissenschaftliche Anwender, sondern an Echolot Neulinge indem es auch viele Basis Fragen beantwortet ebenso auch an Fortgeschrittene indem es auf diverse Punkte tiefer eingeht. Wenn ich den Sinn des Buches in einem Satz beschreiben sollte, dann wäre dies: Echolottechnik für Anfänger interessant und verständlich erklären und dabei auch ein wenig tieferes Wissen für alle zu vermitteln. Mir ist Stand Juni 2017 kein anderes Buch bekannt das diesen Ansatz so konsequent verfolgt. Ich hoffe ihr habt so viel Spaß beim lesen wie ich. Luke www.tacklefever.de
Typical failures that are made with fish finders?
A fish finder’s transducer emits sound waves (just like a ferroelectric speaker) and transmits them toward the ground. The sound waves that are reflected back to the transducer are converted into data that is displayed as a image on the screen. All kinds of factors influence those sound waves on their way to the ground and back.
If the water is warm and salty, the sound waves move more quickly and return to the transducer earlier than they would otherwise. This has an effect on depth measurements and can easily cause incorrect readings to be displayed. Furthermore, salt water has more suspended particles in it, such as plankton or other micro fauna, which can disrupt the signal. 50 kHz signals in salt water are not as easily interfered with as 200 kHz signals in similar conditions. When dealing with cool fresh water, sound waves take longer to travel the same distance – which obviously also has an effect with regard to depth measurements.
The most common mistakes why you get a poor sonar image?
1. The transducer has been mounted incorrectly – your fish finder is now transmitting sound waves either too far forward or rearward. The resulting echo is much weaker and more delayed than it should be, causing inaccurate depth readings and blurry images on-screen. Now, you’re missing all the fish.
2. The inclination of the transducer also varies depending on the speed of the boat. You should therefore always mount your transducer according to the directions in your user’s manual. Manufacturers furthermore often provide fitting jigs, which ensure a proper mounting.
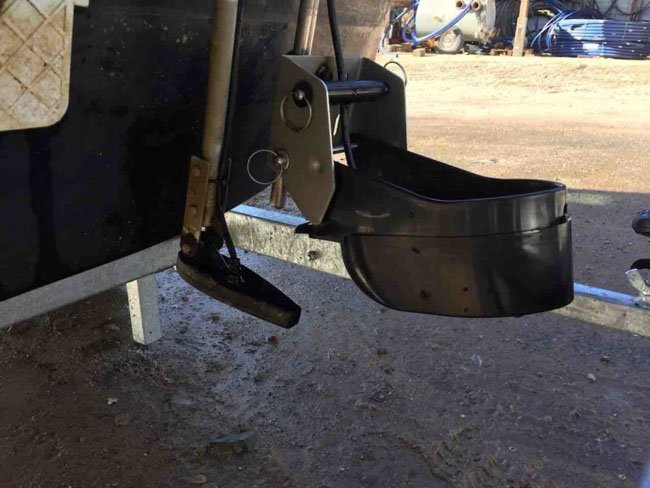
3. The fish finder’s transducer can also be mounted too closely to the propeller, which causes the mass of air bubbles formed there (cavitation) to interfere with the displayed image. Because sound waves can’t travel through the bubbles, there are no measured values to be interpreted/displayed. The measured values within the cavitation zone are higher than the signals from the bottom (and even those from fish).
It’s pretty annoying to spend a lot of money for a quality fish finder, only to discover that it won’t display depth or any other signals. It’s even worse when you realize it’s your own fault. It’s also important to avoid mounting the transducer on sharp edges on the hull of the boat, as that can result in air turbulence as well.
4. On displacement-hull boats, the transducer should be mounted on the foremost third of the vessel. In this case, through-hull transducers should be used so that they are located far enough from the motor.
5. If your boat is gliding, you should mount the transducer as close to the center of the bottom as possible, to ensure contact with the water and minimize turbulences. If you want to get accurate information from your instrument, it is important that you mount the transducer correctly.
6. At low speeds, it’s usually not a problem to go for a stern-mounted transmitter, if you’re using one of the high-quality models found in our fish finder reviews. These units are robust enough and have special software to deal with the corresponding turbulence.
The most common operator errors
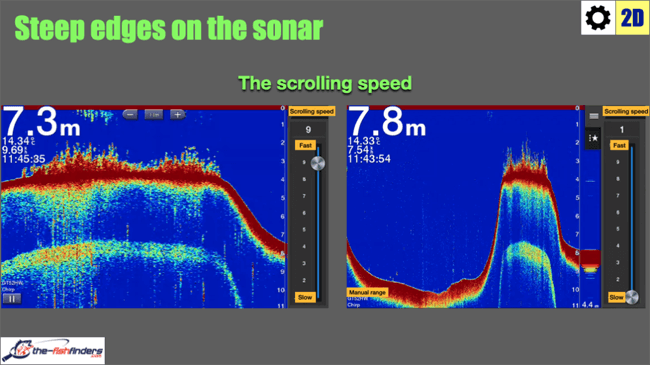
1. Your scroll or ping speed is too high. Almost every fish finder owner has, at some point, set the scroll speed or ping speed to maximum without thinking of the consequences. However lower scroll speeds increase the chances that you’ll find hotspots that you’ve missed in the past.
If you set your scroll speed to the lowest possible setting appropriate for your boat speed, you can get a great overview of the last two minutes of travel. The power of this one little setting can be enough to help you find the one hotspot that all other anglers have simply passed by.
External sources of interference
There are various external factors that can cause interference, including (but not limited to) other fishing boats. The wakes of passing vessels can cause your unit to deliver inaccurate readings. But because they are usually only temporary disruptions, this kind of interference however can generally be disregarded.
You may also experience electrical interference from your other onboard electronics. High-frequency interference is usually caused by the motor or generator. This kind of disruption usually manifest themselves in the form of inaccurate depth readings.
Other depth finders that are transmitting an identical frequency to yours can also interfere with your signal and produce inaccurate data. The kicker is, when all anglers position their boats near a hotspot and set their respective depth finders to 200 kHz.
This causes 200 kHz soundwaves to be distributed to all directions – that subsequently are collected and processed by the transducers on each and every boat. The problem is, that you don’t know, where the 200 kHz echo you are receiving originally came from. Not only does this produce inaccurate depth readings, it also shows fish where there simply aren’t any.
Note
The only thing that can help in such a situation with loads of boats around a single fishing spot, would be to utilize a different frequency – or use your fish finder’s CHIRP feature. If it has one.
-
The Ultimate Fish Finder Guide
Download 40 pages for free now
Reviews ( 17 )
- Rated 5 out of 5
Raphaël G
Very effective. - Rated 5 out of 5
Vladimir M
The book describes the fish finder physics and builds up your understanding of how it actually works. I have yet to apply this knowledge with my Humminbird, but having that much of theory is extremely helpful in understanding and processing the sonar output. - Rated 5 out of 5
NICHOLAS JOHN REECY
The Deeper Guide was just what I was looking for. YouTube is full of reviews of the sonar but little in the way of education. I highly recommend for those wanting to better understand their Deeper sonar. - Rated 5 out of 5
Henrik
I am a beginner when it comes to fishing with fish finders. For me, the book has been very informative to judge the displays on the fish finder "realistically" and to recognize what limits there are when searching for fish with the fish finder. Now I know when I have to use my regular sonar and when I have to use my ClearVü or which settings I should apply to the device at which spot. I was impressed by the many illustrations, especially for understanding the functions. - Rated 5 out of 5
Dr. Manfred Marx
Very well written, so that it is understandable even for amateurs and structured concisely. - Rated 5 out of 5
Andreas Witz
An excellent book for learning about fish finders. - Rated 5 out of 5
AK
The ultimate fish finder guide is a beneficial introduction. I am excited to put into practice what I have learned. - Rated 5 out of 5
Lübbe Wolfgang
A well-written problem solver. - Rated 5 out of 5
Kalksee
The book is unmatched for understanding how a sonar/fish finder works. I was a fish arch hunter, and I suspect my fishing tactics will change. The book has clear writing, and you understand you understand a lot the first time you read it. I can only recommend it to anyone interested in technology. Thank you for this fantastic book! Thoralf - Rated 5 out of 5
Enrico Indelicato
I had absolutely no idea about fish finders. Since I read the book, I had a real Aha experience! For me, as a beginner, very detailed and uncomplicated explained. I can only recommend it! Best regards Enrico - Rated 5 out of 5
Udo
Reading this book has suddenly made my fish finders much more valuable to me! I realized that I made typical mistakes in interpreting the images, which I will now avoid. The authors use clear, understandable language and also explain the mathematical-physical basics very well. The fact that there is no advertising for one or another fish finder manufacturer has increased its credibility. At the same time, you get a solid impression of what is feasible today on this subject - and the "advertisements" of the manufacturers also helped. The book is ABSOLUTELY to recommend, because what good is an expensive fish finder if you too often draw the wrong conclusions from the obtained illustrations? In this respect, the money for the book is very well invested. - Rated 5 out of 5
Josef Weiss
I had to wait a long time for such great explanations. Thank you. - Rated 5 out of 5
Peter
It is a well-described, scientifically sound book highly recommended to anyone who wants to advance and doesn't already know everything. - Rated 5 out of 5
Holger Just
Ich angle seit Jahren mit Echolot. Aber erstens bleibt man da irgendwann auf einer bestimmten Verständnisstufe stehen, diese konnte ich durch dieses Buch um einiges anheben. Als zweiten Aspekt mußte ich nach dem Lesen dieses Buches erkennen, dass ich durch "gefährliches Halbwissen" jahrelang Fehlinterpretationen hatte bzw. die Möglichkeiten meines Lotes nie richtig ausgenutzt habe. Also mein Fazit : Sehr empfehlenswert, die komplexen Zusammenhänge sind verständlich beschrieben. Das Buch ist ideal geeignet um sich in der angelfreien Zeit wertvolles Wissen für die folgende Saison anzueignen und beim Thema Echolot wieder uptodate zu sein. - Rated 5 out of 5
Matthias Wappler
Sehr gut!! - Rated 5 out of 5
M. Hermanns
Wer dieses Buch nicht liest, ist selber Schuld! Kein Vortrag, kein Presseartikel oder Bericht, Nein sogar keine Online-Schulung oder gar ein 365 Tage Support, vermittelt so viele essentielle Kenntnisse, wie dieses Buch. Nach zwei drei bebilderten Erklärungen wird dir klar, das ohne dieses Wissen, die Gewinn bringende Nutzung eines Echolotes gar nicht möglich ist. Beziehungsweise dir wird klar das du dein Echolot bisher sehr ineffizient genutzt hast und das dir eine Menge verborgen geblieben ist. Ich habe nach dem ersten gleich drei weitere Exemplare gekauft und drei guten Angelfreunden eine Anerkennung für unsere Freundschaft mit diesem Buch gemacht. Alle drei verfügen über 30 Jahre Bootsangelerfahrung und alle drei waren ebenfalls begeistert, jeder konnte sein Wissen deutlich erweitern. Deshalb freue ich mich auch so sehr auf das Zanderbuch welches hoffentlich noch vor dem Wochenende bei mir ist. Liebe Grüße weiter so. dermarc - Rated 5 out of 5
TACKLEFEVER
Das Buch beginnt mit rund 15 Seiten Technik Erläuterung bei der versierte Echolot Nutzer, zu denen ich mich zähle, vielleicht geneigt sind weiter zu blättern weil sie vieles schon wissen und Anfänger weiter blättern möchten weil es zu trocken scheint. Aber etwas Basiswissen gehört einfach dazu. Selbst wenn man als Anfänger bei der Basis Theorie weiter blättern will, sobald es um Chirp geht sollte "jeder" genauer hinschauen 😉 es lohnt sich. Und auch für mich fand ich noch ein zwei kleine Dinge die ich nicht wusste oder noch nicht im Zusammenhang mit anderem sah. Die weiteren Abschnitte (bis Kap. 3) befassen sich mit den verschiedenen Techniken der Geber, Bildschirme, oder dem Smartphone, dem Tablet als Anzeigemedium. Was mir bis dahin sehr positiv auffiel waren die "MERKE-Boxen", kleine übersichtliche Passagen welche Kerninformationen des zuvor vermittelten Wissen zusammenfassend hervorheben. Auch wenn man nicht alles komplett verstanden hat, hilft diese leicht verständliche Zusammenfassung des voraus gegangenen Inhalts sehr. Kapitel 4 geht auf 2D, Down-Imaging, Side-Scan-Sonar ein, dabei ohne zu konkret auf einen Hersteller abzustellen was ich ebenfalls sehr positiv fand. Dem Angler wird der praktische Einsatz und das Verstehen dessen was man auf dem Echolot sieht erläutert. Fragen wie z.B.: Wo befindet sich der Fisch genau? Was ist eine Fischsichel? Wie setze ich das Echolot beim Vertikalangeln ein? Warum gibt es Vertiefungen obwohl man keine sieht und umgekehrt? Wie erkenne ich die Bodenbeschaffenheit? Fragen zur richtigen Deutung der Unterwasserstruktur, dem optimalen Bildlauf- und Boots- Geschwindigkeit, der Sprungschicht, usw. werden auch beantwortet. Würde ich alles aufzählen würde es hier zu weit führen. Es folgen noch kurze Infos zur Multibeam Technik und ein Kapitel "Die 3D Show mit Garmins Panoptix". Hier wurde für mich zu wenig Wissen vermittelt, nur auf einen Herstellers gezeigt und nicht auf ähnliche Funktionen oder Techniken anderer Hersteller Bezug genommen. Ich hoffe es kommt in der nächsten Auflage mehr zu dem Thema. Am Ende des Buches kommen Infos rund um konkrete Einstellungen am Echolot. Hier wird einer der wichtigsten Punkte überhaupt behandelt und dies praxisnah und hilfreich. Aller spätestens jetzt lohnt sich das Buch für alle Neueinsteiger. Viel einfacher und kompakter geht es kaum. Ein paar wichtige zuvor besprochene Punkte zu Einstellungen bei bestimmten Echolot Funktionen werden erläutert und mit Checklisten im Kapitel "Die effektivsten Einstellungen beim Echolot auf einen Blick" zusammen gefasst. Hier lohnt es sich für Anfänger die Seiten besonders aufmerksam zu lesen und vielleicht als Kopie mit auf Boot zu nehmen. Damit fällt der Kampf mit den gefühlten tausenden von Einstellungen am Echolot auf dem Wasser leichter. Es klingt fast zu schön um wahr zu sein, aber tatsächlich scheint mir das Buch für Anfänger und Fortgeschrittene Anwender gleichermaßen gut geeignet zu sein. Manchmal suchte ich mehr Hintergrundwissen, weil der im Prinzip sehr gute Ansatz es für Anfänger leicht verständlich zu halten manche Herstellerabhängige Feinheiten außer Acht lässt. Das Buch hat eine gute Gliederung, fasst vieles kompakt zusammen und geht bei wichtigen Punkten auch meist für Fortgeschrittene etwas in die Tiefe. So richtet sich das Buch meiner Meinung nach nicht an wissenschaftliche Anwender, sondern an Echolot Neulinge indem es auch viele Basis Fragen beantwortet ebenso auch an Fortgeschrittene indem es auf diverse Punkte tiefer eingeht. Wenn ich den Sinn des Buches in einem Satz beschreiben sollte, dann wäre dies: Echolottechnik für Anfänger interessant und verständlich erklären und dabei auch ein wenig tieferes Wissen für alle zu vermitteln. Mir ist Stand Juni 2017 kein anderes Buch bekannt das diesen Ansatz so konsequent verfolgt. Ich hoffe ihr habt so viel Spaß beim lesen wie ich. Luke www.tacklefever.de
This brings us to the end of this article with the most important fish finder tips. If you now know how to use a fish finder, but are still unsure about which sonar to buy for fishing, you can a have a look at the other fish finder reviews in our extensive fish finder test (including the newest models of all important fish finder manufacturers like Garmin, Lowrance, Humminbird or Raymarine) or write us a short message. Have fun on your next angling trip and “Petri Heil” – Jens and Martin.
Could you take 1 Click to share your experiences?
We will be forever grateful. With your rating we can improve.
average rating 4.6 / 5. Number of ratings: 145
Be the first to rate this post!


Raphaël G
Vladimir M
NICHOLAS JOHN REECY
Henrik
Dr. Manfred Marx
Andreas Witz
AK
Lübbe Wolfgang
Kalksee
Enrico Indelicato
Udo
Josef Weiss
Peter
Holger Just
Matthias Wappler
M. Hermanns
TACKLEFEVER